Sonarqube is a popular tool used to derive code quality metrics like Code Coverage, Code Duplication, Code Cyclomatic complexity and Method Cohesion.
The most typical way of using Sonarqube is to install it on an on premise server or an EC2 instance in cloud and ensure to keep it running. The alternative to installing Sonarqube on server is to use Sonarqube service which has its own cost implication. Through this blog I would like to present a cheaper and serverless way of installing Sonarqube for large development projects.
We shall be running Sonarqube as a docker inside the aws ECS (Elastic Container Service) which will be connecting to RDS database instance to store metrics.
Step 1 : Setting up the database
Navigate to the aws RDS service on aws console :
- Click on create Database
- click on MySQL
- Under engine option select MySQL
- Under settings section provide DB instance identifier name as sonar
- Type master password as yourpassword123 and confirm the same password in the next field.
- DB instance class select Burstable classes
- Storage select allocated storage 100
- Maximum storage threshold 500
- Click on create database.
- While entering password don’t use special characters (! @#$%).


Step 2 : Creating the docker container from Sonarqube
We shall be using an EC2 instance just for the purpose of creating and packing the docker. It can be recycled after our serverless Sonarqube is up and running.
- login to the AWS dashboard
- click on services
- select EC2 instance
- click on launch instance button
- select Ubuntu Server 18.04 LTS (64-bit) AMI.
- Select the instance type as t2. Medium
- Configure Instance : No changes , click Next
- Add storage: choose 30 GB size for storage.
- Add tag , any relevant name of your choice.
- Configure Security Group, select all traffic anywhere, enable port 9000.
- Click on review and launch instance. EC2 instance will be created.
- Install MySQL CLI to interact with database.
$ sudo apt-get install mysql-client-core-5.7
$ mysql -h Db url -u admin -p
  Enter password: [mysql password]
    CREATE DATABASE sonar CHARACTER SET utf8 COLLATE utf8_general_ci;
    CREATE USER 'sonar' IDENTIFIED BY 'sonar';
    GRANT ALL ON sonar.* TO 'sonar'@'%' IDENTIFIED BY 'sonar';
    GRANT ALL ON sonar.* TO 'sonar'@'localhost' IDENTIFIED BY 'sonar';
    FLUSH PRIVILEGES;

- Install docker on the EC2 instance.
$ curl -fsSL https://download.docker.com/linux/ubuntu/gpg | sudo apt-key add –Add the Docker repository to APT sources:
$ sudo add-apt-repository "deb [arch=amd64] https://download.docker.com/linux/ubuntu $(lsb_release -cs) stable"update the package database with the Docker packages from the newly added repo:
$ sudo apt-get update
$ apt-cache policy docker-ce
Install docker:
$ sudo apt-get install -y docker-ceDocker is installed, the daemon started, and the process enabled to start on boot
Ensure that it’s running:
$ sudo systemctl status docker- Create the Dockerfile for the SonarQube installation and configure the SonarQube with RDS MySQL. Run the Dockerfile using the below command.
$ docker build -t sonarqube [imagename]Dockerfile
FROM openjdk:11-jre-slim

RUN apt-get update \
    && apt-get install -y curl gnupg2 unzip \
    && rm -rf /var/lib/apt/lists/*

ENV SONAR_VERSION=7.5 \
    SONARQUBE_HOME=/opt/sonarqube \
    SONARQUBE_JDBC_USERNAME=admin \
    SONARQUBE_JDBC_PASSWORD=MyPassword123 \
    SONARQUBE_JDBC_URL="jdbc:mysql://sonar.cxxxxxxxxxx.us-west-2.rds.amazonaws.com:3306/sonar?characterEncoding=utf8&useUnicode=true&rewriteBatchedStatements=true&useSSL=false"

# Http port
EXPOSE 9000

RUN groupadd -r sonarqube && useradd -r -g sonarqube sonarqube

# pub   2048R/D26468DE 2015-05-25
#       Key fingerprint = F118 2E81 C792 9289 21DB  CAB4 CFCA 4A29 D264 68DE
# uid                  sonarsource_deployer (Sonarsource Deployer) <infra@sonarsource.com>
# sub   2048R/06855C1D 2015-05-25
RUN for server in $(shuf -e ha.pool.sks-keyservers.net \
                            hkp://p80.pool.sks-keyservers.net:80 \
                            keyserver.ubuntu.com \
                            hkp://keyserver.ubuntu.com:80 \
                            pgp.mit.edu) ; do \
        gpg --batch --keyserver "$server" --recv-keys F1182E81C792928921DBCAB4CFCA4A29D26468DE && break || : ; \
    done

RUN set -x \
    && cd /opt \
    && curl -o sonarqube.zip -fSL https://binaries.sonarsource.com/Distribution/sonarqube/sonarqube-$SONAR_VERSION.zip \
    && curl -o sonarqube.zip.asc -fSL https://binaries.sonarsource.com/Distribution/sonarqube/sonarqube-$SONAR_VERSION.zip.asc \
    && gpg --batch --verify sonarqube.zip.asc sonarqube.zip \
    && unzip -q sonarqube.zip \
    && mv sonarqube-$SONAR_VERSION sonarqube \
    && chown -R sonarqube:sonarqube sonarqube \
    && rm sonarqube.zip* \
#   && rm -rf $SONARQUBE_HOME/bin/*

	# create copies or delete directories allowed to be mounted as volumes, original directories will be recreated below as symlinks
    && rm --recursive --force "$SONARQUBE_HOME/bin"/* \
    && mv "$SONARQUBE_HOME/conf" "$SONARQUBE_HOME/conf_save" \
    && mv "$SONARQUBE_HOME/extensions" "$SONARQUBE_HOME/extensions_save" \
    && rm --recursive --force "$SONARQUBE_HOME/logs" \
    && rm --recursive --force "$SONARQUBE_HOME/data" \

# create directories to be declared as volumes
# copy into them to ensure they are initialized by 'docker run' when new volume is created
# 'docker run' initialization will not work if volume is bound to the host's filesystem or when volume already exists
# initialization is implemented in 'run.sh' for these cases
    && mkdir --parents "$SONARQUBE_HOME/conf" \
    && mkdir --parents "$SONARQUBE_HOME/extensions" \
    && mkdir --parents "$SONARQUBE_HOME/logs" \
    && mkdir --parents "$SONARQUBE_HOME/data" \
    && cp --recursive "$SONARQUBE_HOME/conf_save"/* "$SONARQUBE_HOME/conf/" \
    && cp --recursive "$SONARQUBE_HOME/extensions_save"/* "$SONARQUBE_HOME/extensions/" \
# create symlinks to volume directories
    && ln -s "$SONARQUBE_HOME/conf" "$SONARQUBE_HOME/conf" \
    && ln -s "$SONARQUBE_HOME/extensions" "$SONARQUBE_HOME/extensions" \
    && ln -s "$SONARQUBE_HOME/logs" "$SONARQUBE_HOME/logs" \
    && ln -s "$SONARQUBE_HOME/data" "$SONARQUBE_HOME/data" \
    && chown --recursive sonarqube:sonarqube "$SONARQUBE_HOME"

VOLUME "$SONARQUBE_HOME/data"
VOLUME "$SONARQUBE_HOME/conf"
VOLUME "$SONARQUBE_HOME/logs"
VOLUME "$SONARQUBE_HOME/extensions"

COPY --chown=sonarqube:sonarqube run.sh "$SONARQUBE_HOME/bin/"

USER sonarqube
WORKDIR $SONARQUBE_HOME
RUN ["chmod", "+x", "./bin/run.sh"]
ENTRYPOINT ["./bin/run.sh"]
$ docker run -d --name sonarqube[container name] \
-p 9000:9000 \
-e sonar.jdbc.username=sonar \
-e sonar.jdbc.password=sonar \
-v sonarqube_conf:/opt/sonarqube/conf \
-v sonarqube_extensions:/opt/sonarqube/extensions \
-v sonarqube_logs:/opt/sonarqube/logs \
-v sonarqube_data:/opt/sonarqube/data \ sonarqube
- The docker container will now be created and can be verified as below
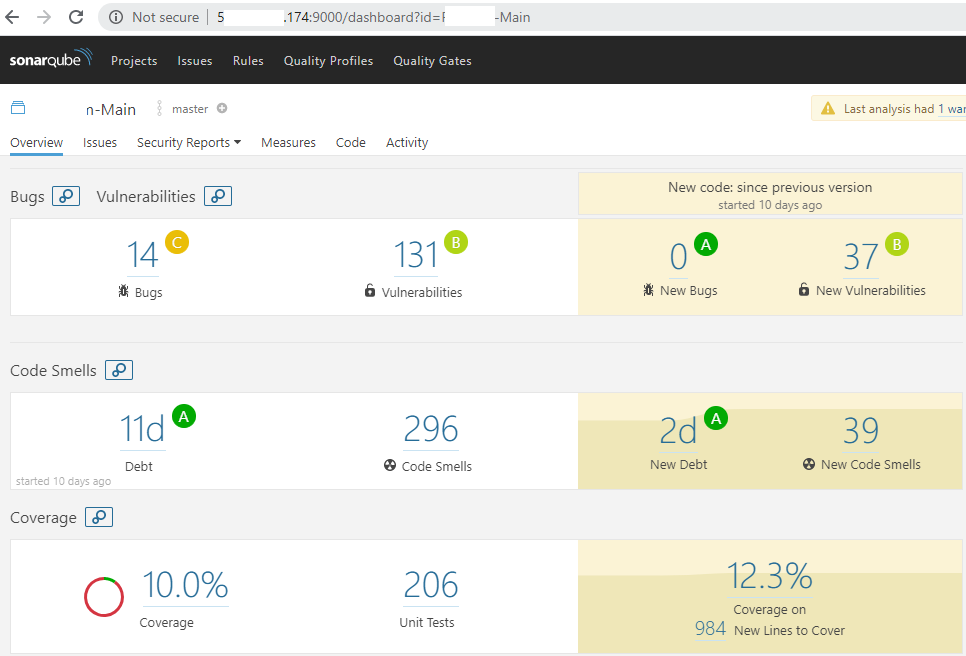
$ docker psOpen a browser pointing to http://y.x.w.z:9000
SonarQube dashboard will launch locally. Where y.x.w.z is the public ip address of the EC2 instance on which the docker container is running.
Step 3 : Creating Repository in AWS ECR to push the docker image created above
On the same EC2 instance referred to above, install aws cli
$ sudo apt-get install awscli
$ aws –version
Authenticate into aws using
aws configure
aws access key: **********
secret key: *********
Login to the AWS elastic container registry through aws cli:
$ aws ecr get-login -- region [your-region]> text.txtAuthenticate docker to AWS Elastic container registry.
$ docker login –u AWS https://aws_account_id.dkr.ecr.eu-west3.amazonaws.com
Password: *****[AWS account password]
Create a repository in AWS Elastic container registry (ECR)
$ aws ecr create-repository --repository-name sonarqube
List the images stored into docker and tag them:
$docker images
$docker tag {base imagename} aws_account_id.dkr.ecr.eu-west-amazonaws.com/imagename[sonarqube]:tag[latest]
Push the image into ECR
$ docker push aws_account_id.dkr.ecr.us-east-1.amazonaws.com/imagename[sonarqube]:tag name[latest]
Step 4 : Creating Cluster in ECS
- Open the Amazon ECS console at https://console.aws.amazon.com/ecs/
- From the navigation bar, select the Region to use.
- In the navigation pane, choose Clusters.
- On the Clusters page, choose Create Cluster with the configurations.
- For Select cluster compatibility, choose Networking only, then choose Next step.
- On the Configure cluster page, enter a Cluster name.
- In the Networking section, configure the VPC for your cluster. You can retain the default settings, or you can modify these settings with the following steps.
a). If you choose to create a new VPC, for CIDR Block, select a CIDR block for your VPC.
b). For Subnets, select the subnets to use for your VPC.
- In the CloudWatch Container Insights section, choose whether to enable Container Insights for the cluster
- Choose Create.
Step 5 : Creating Task Definition
- Open the Amazon ECS console at https://console.aws.amazon.com/ecs/
- In the navigation pane, choose Task Definitions, Create new Task Definition
- On the Select compatibilities page, select the launch type that your task should use and choose Next step.
- Choose the Fargate launch type and configure it.
- For Task Definition Name, type a name for your task definition.
- For Task Role, choose an IAM role that provides permissions for containers in your task to make calls to AWS API operations
- For Task execution IAM role, either select your task execution role or choose Create new role so that the console can create one for you.
- For Task size, choose a value for Task memory (GB) and Task CPU (vCPU). The table below shows the valid combinations.
- Add container details.
- Choose Create.


Step 6 : Creating Service
Service runs the task definition.
- Open the Amazon ECS console at https://console.aws.amazon.com/ecs/
- click on create service and create the service.
- configure service.


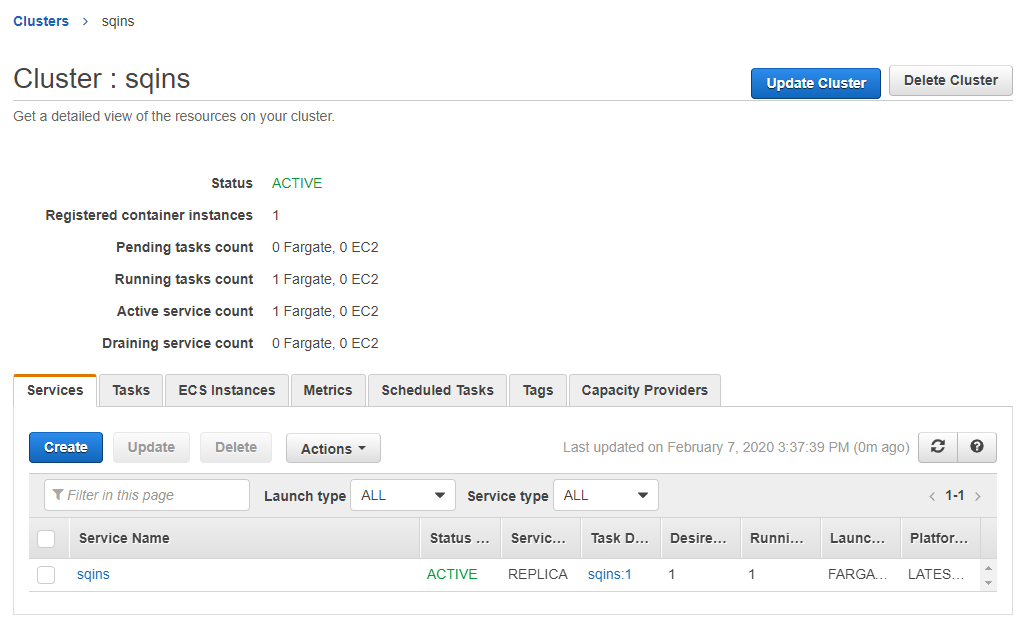
Step 7 : Accessing the sonarqube dashboard from the ECS cluster
- Navigate to cluster
- click on tasks
- click on container
- control flows to next page where underneath the network section you find the Public Ip address.
- Open any browser and type Public ipaddress:9000 ,sonarqube dashboard will launch

Destination reached
Reference :
https://www.systems-plus.com/deploying-docker-containers-in-amazon-ecs-using-fargate/
I’m getting this error
Step 12/16 : COPY –chown=sonarqube:sonarqube run.sh “$SONARQUBE_HOME/bin/”
COPY failed: file not found in build context or excluded by .dockerignore: stat run.sh: file does not exist
Can you help me?
LikeLike
Are you running the docker commands as root or sudo ? If not then please do so.
Are you getting the error at this line : COPY –chown=sonarqube:sonarqube run.sh “$SONARQUBE_HOME/bin/” . If so then did you check the owner and group of run.sh before executing the command using ls -lrt run.sh ?
do a chown sonarqube:sonarqube run.sh before running the docker build and modify the above command to COPY run.sh “$SONARQUBE_HOME/bin/”
LikeLike
Great article! I get a “Copy failed: file not found in build context or excluded by .dockerignore: stat run.sh: file does not exist. Any suggestions? Thanks!
LikeLike
Thanks for the compliment.
Are you running the docker commands as root or sudo ? If not then please do so.
Are you getting the error at this line : COPY –chown=sonarqube:sonarqube run.sh “$SONARQUBE_HOME/bin/” . If so then did you check the owner and group of run.sh before executing the command using ls -lrt run.sh ?
do a chown sonarqube:sonarqube run.sh before running the docker build and modify the above command to COPY run.sh “$SONARQUBE_HOME/bin/”
LikeLike
Overall I found this article very useful. However, I experienced the same issue cited in the previous two posts. Sharing my solution. In step 2 it is necessary to create 2 files in the same directory. One is Dockerfile, paste the contents shown in the article and edit. The second is run.sh. Creating this file isn’t mentioned and I assumed it would get created by the docker build. It doesn’t. instead create this file and paste in the text shown below the Dockerfile contents. I had to modify that a little to avoid syntax errors.
Here is my contents, where –name=sq is used:
docker run -d –name=sq sonarqube \
-p 9000:9000 \
-e sonar.jdbc.username=sonar \
-e sonar.jdbc.password=sonar \
-v sonarqube_conf:/opt/sonarqube/conf \
-v sonarqube_extensions:/opt/sonarqube/extensions \
-v sonarqube_logs:/opt/sonarqube/logs \
-v sonarqube_data:/opt/sonarqube/data \ sonarqube
I hope this helps others get unstuck.
Keep up the great work, it is the easiest article I found.
LikeLike
My container is exiting almost immediately. Not sure what I missed.
LikeLike
Are you saying that your docker container is exiting immediately after running the docker run command ? Did you allocate atleast 30 gb or more of space as stated ? Hope you also checked /opt/sonarqube/logs for the exception details.
LikeLike
The run.sh is missing from your article. My suggestion last night is wrong. I’m learning quite a bit about Docker trying to figure out what should be in run.sh. But not there yet.
LikeLike